
SteveOEM1
Active Member
- Joined
- Mar 24, 2013
- Messages
- 153
I've recently changed my lower ball joints - it was the first time I've done this so thought I would share a DIY that might help others in the future. Its pretty basic and really doesn't take that long.
Tools Needed
- 10, 17, 32mm sockets / ratchet
- 17mm spanner
- Philips & flat head screwdrivers
- Ball joint splitter
- Pliers
- Retaining/Snap ring pliers
- Rubber mallet
- Club hammer (or something pretty hefty!)
- Large deep impact socket (I think I used a 28 or 30mm)
- Torque wrench
- Freezer
Part Needed
- New ball joints") rolleyes - should come with new retaining clips & nuts
rolleyes - should come with new retaining clips & nuts
- New hub nuts (recommended)
- Some fresh cotter pins
Before starting work always ensure your car is properly supported on axle stands on level ground, and chocked at the rear when raised at the front. Also, penetrating fluid is always a good idea before trying to remove nuts that haven't been changed for a decade.
I am in no way saying this is the correct method for doing this, purely sharing what I've learn't and how I achieved it in the absence of a press:
So this is how it went...
1. Place your ball joints in the freezer the night before for them to contract as much as possible.
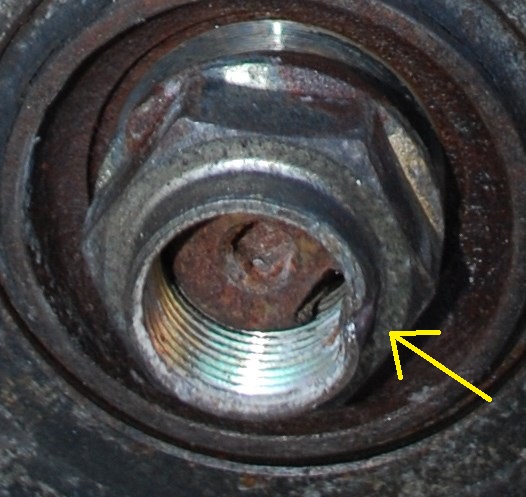
2. Before you get the car up on axle stands, it will help to loosen the hub nut (32mm) whilst the wheels are still on (seems obvious but you'll need to remove your center cap in order to do this). The hub nut should have had a crease made in it where its been 'locked' in place (see below), you'll need to fold this back out before you start loosening it. Also a breaker bar might be necessary to get the nut moving.
3. (Skip this part if you don't have ABS) Now with the car raised and the wheel off, the next step is to detach the ABS wire so its not attached when you remove the knuckle.
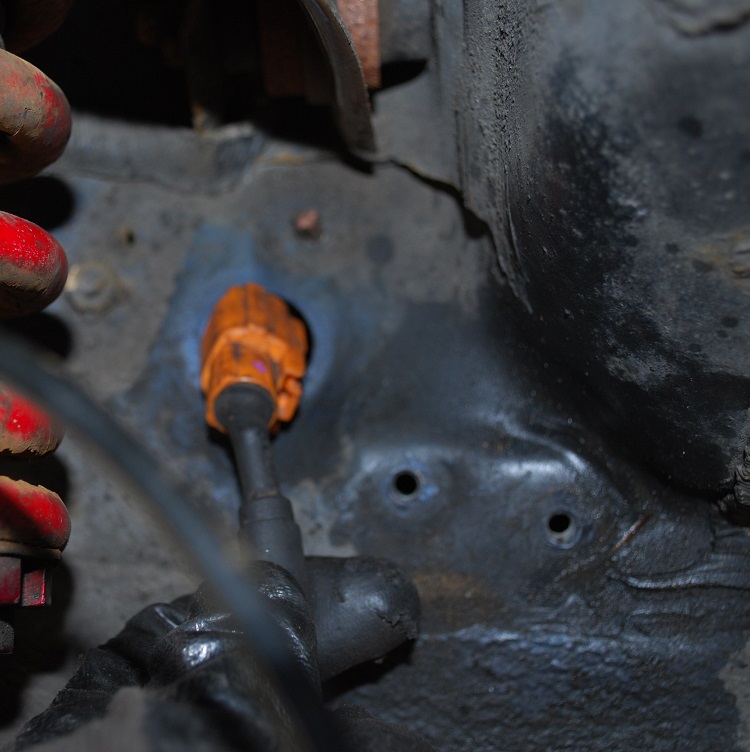
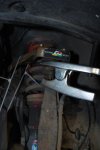
Firstly, inside the engine bay next to the strut tower you'll see this orange plug (see below) that you need to undo - note you'll need to press in the clip on the female part of the plug, and have some patience - they can be stubborn.

Now in the arch, the bracket holding the ABS wire to the car needs to be undone; remove the 2 x 10mm bolts (see below)

The orange ABS plug can now be guided out through a hole in the arch (see below). You'll need to remove a grommet and get the plug at the right angle to persuade it through the hole - don't pull on the lead, feed it through.
4. Next up the brakes need to be removed from the knuckle: For the caliper, start by removing the bracket that holds the flexi brake line to the knuckle - 2 x 10mm bolts.

Now that the lines free, undo the 2 17mm bolts (pic below) holding the caliper to the hub, and persuade the caliper off the disc (rubber mallet might help..) - be ready to support the caliper as it comes off the disc.

Next you want to support the caliper somewhere out the way, where there's no stress on the brake lines. I used cable ties to hang the caliper from the upper arm.
Now undo the cross head screws (below) holding the brake disc to the hub and slide the disc off. I've found using the correct philips head and a 1/4" ratchet is best with these little screws if they've been in a while - you don't want to burr the head and end up having to drill out!

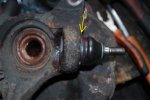
5. Next up is the track rod end, attached to the knuckle via a ball joint (see below, this is obviously after its been removed). In order to remove it you'll need to pull the cotter pin (if there is one - I'd recently replaced mine with non-Honda parts that just came with a self lock nut) out from the ball joint stud, and loosen the 17mm castor nut right off.
Using the ball joint splitter you can then pop the ball joint free from the knuckle (for those not used to using them, it's best to thread the castor nut back on the stud a few turns before using the splitter - this will stop any parts becoming airborn in your direction, if it takes a lot of pressure to release the ball joint). But make sure you've loosened the nut off completely and then threaded back on before you split the ball joint, otherwise you'll just spin the stud when you try to get the castor nut off - I've learn't the hard way more than once - damned short term memory!

Careful not to damage the these ball joints when you split them - probably a good time to replace them if they're as old as the lower ball joints!
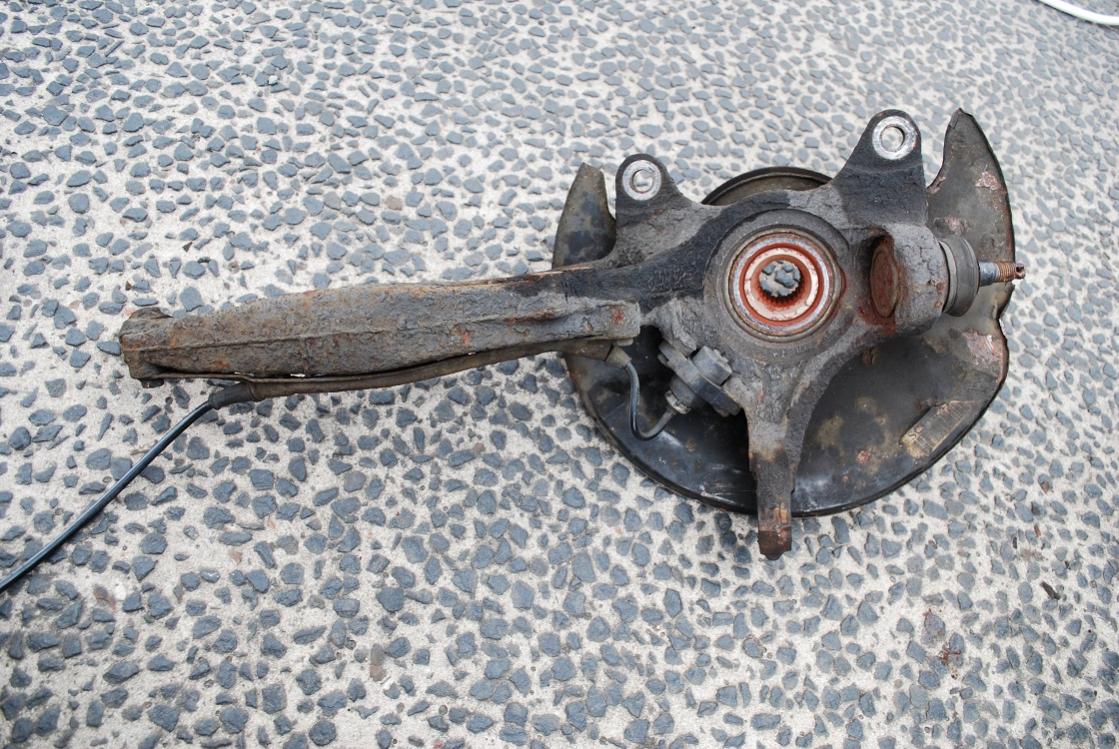
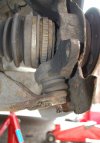
6. Now the only parts holding the knuckle on will be the lower ball joint, the ball joint in the upper/camber arm and the hub nut.
Firstly loosen the hub nut some more but don't take it off - now with a rubber mallet give the nut a few gentle taps until the drive shaft moves a touch. This is just to help it come out easily later on - now go ahead and take the nut right off.
For the lower ball joint, this is now the time you find out if its going to come off with or without a fight!
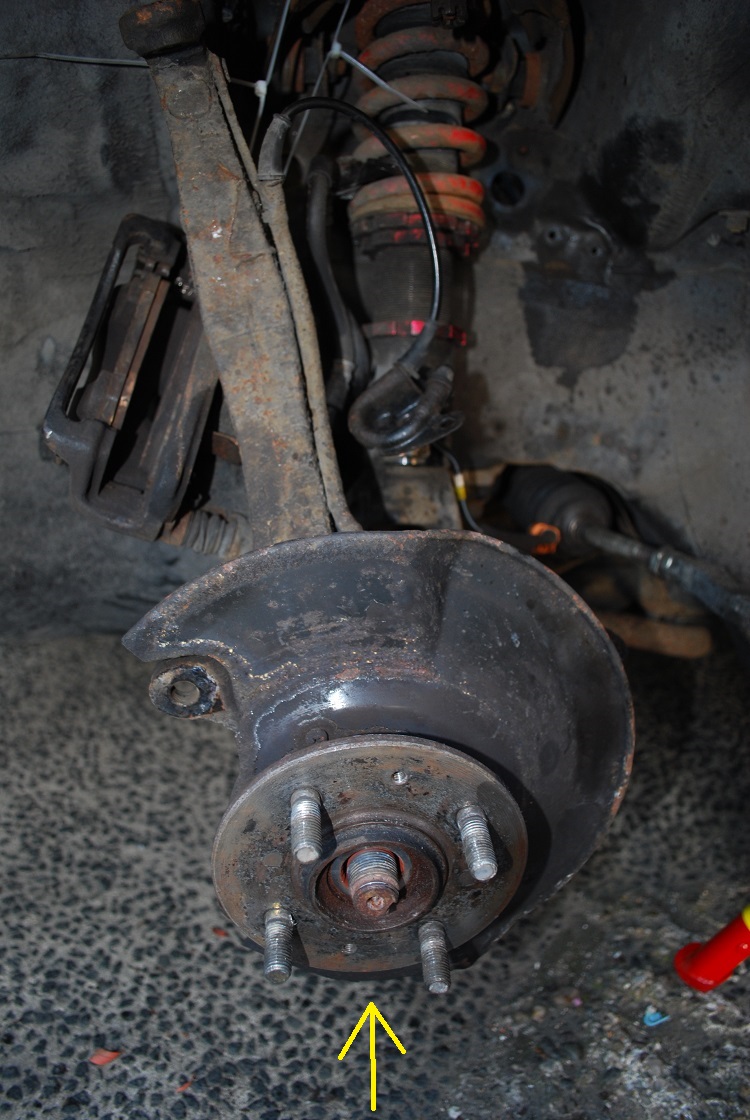
The 17mm castle nut is located as shown below, if there's a cotter pin present remove it.
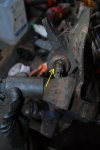
Given that these castor nuts are likely to be old if your ball joints have had it (136k miles on mine), they are likely going to spin the stud inside the ball joint when you try to undo them. So for the first side I did, I got around this by using the trolley jack to raise the lower arm slightly and use the weight of the car to push down on the ball joint (be conscious of where your car is on the axle stands when doing this). This held the stud firm enough for me to release the castor nut.
But... on the second one (below), nothing I tried would stop the stud spinning so I resorted to a dremmel and cut the nut off (I'm not delicate enough with an angle grinder )
)

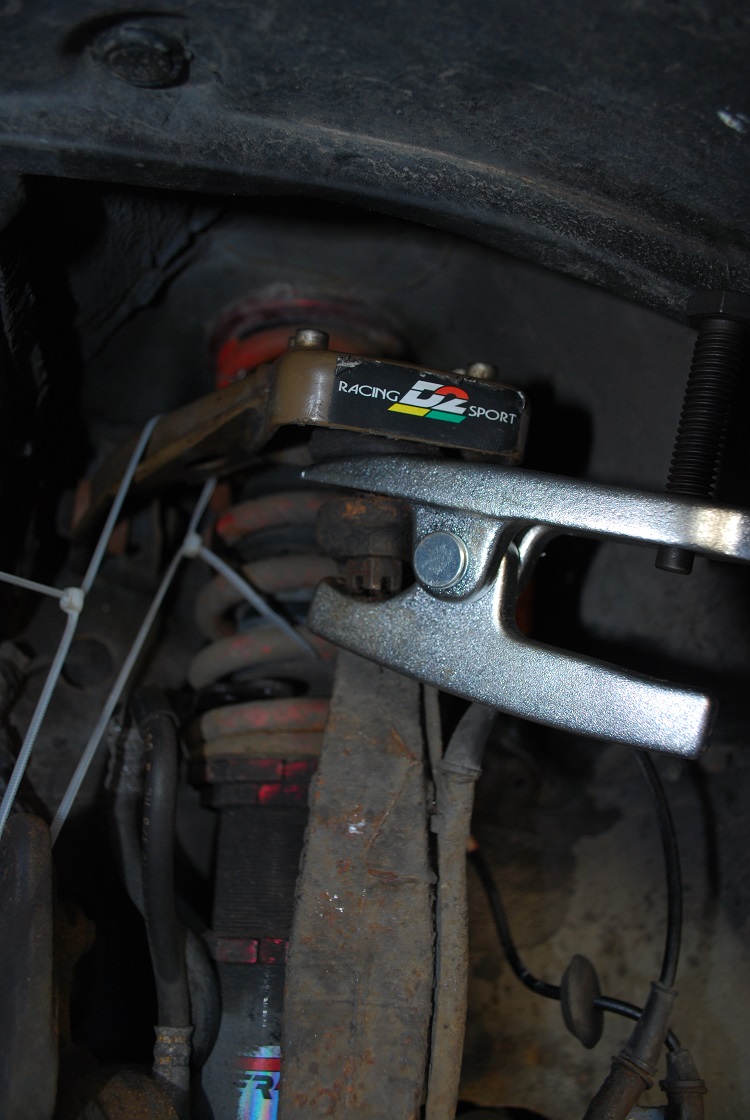
Before you split the lower ball joint, its time remove the upper arm - procedure would be the same as the track rod end (cotter pin/loosen nut/split ball joint carefully/remove nut) - only difference being you'll likely need a 17mm spanner for this one as its in a tricky spot to get a socket on.
Now finally go ahead and use the ball joint splitter again and pop the knuckle free from the lower arm. You should be able to gently separate the knuckle from the drive shaft and end up with this -
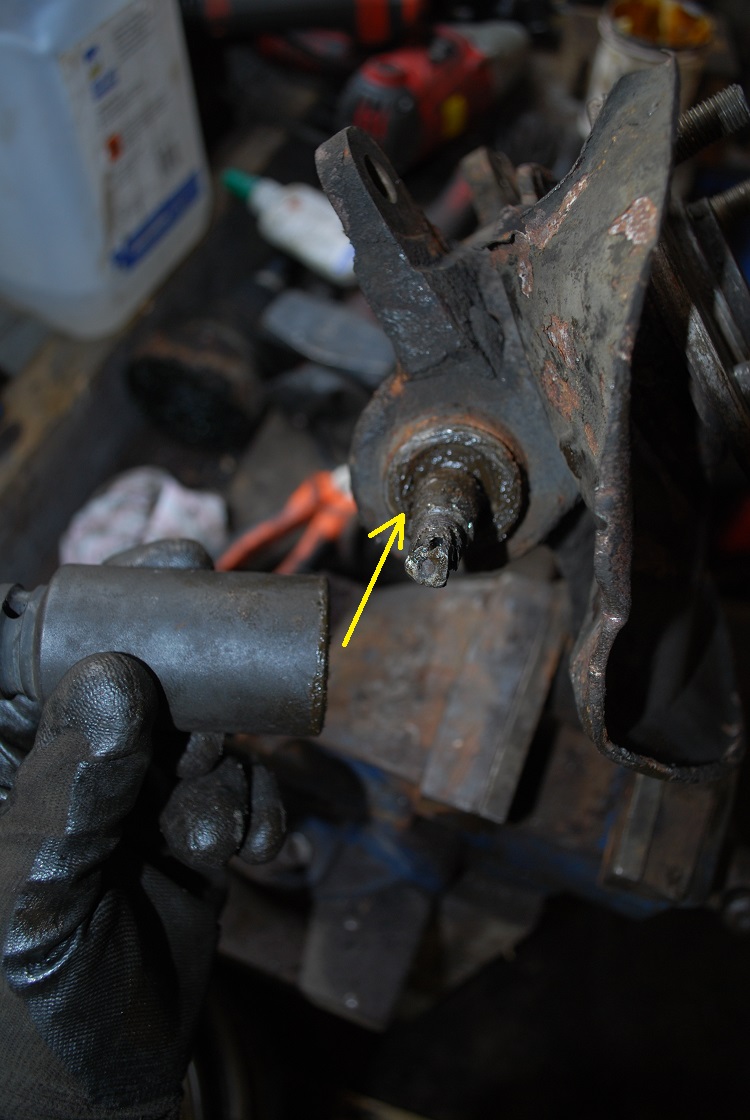
7. Take the knuckle over to a suitable work bench and try and rope in an extra pair of hands to hold it steady (not a great shape for a vice!). Firstly pry off the rubber boot, with a flat head screwdriver under the ring holding it on.
Now take a deep impact socket with a similar diameter to the ball joint (IIRC I used 28 or 30mm) - with it held on the stud side, take a club hammer and with a few hard hits you should knock the ball joint through and out.
8. Now prep the knuckle for the new ball joint, I used a wire wheel attachment to clean up the inner faces, and then applied a decent amount of grease (red rubber in this case as that's what I had to hand, but any should do as its just to help the new ball joint in).
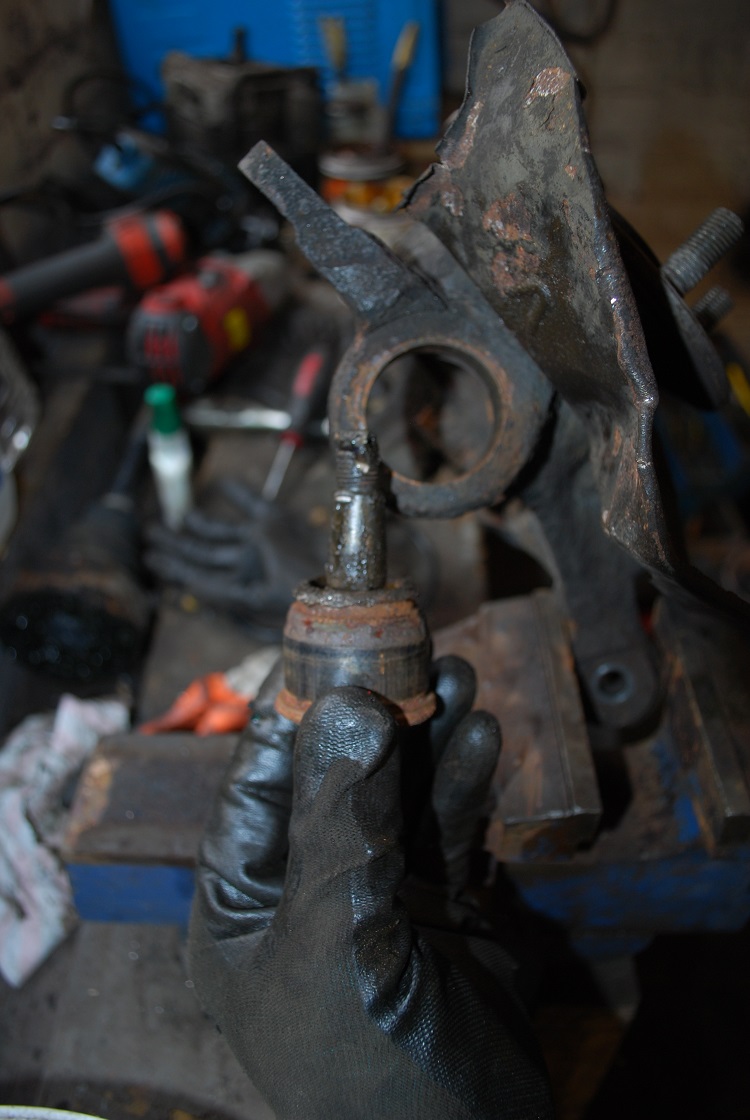
9. Its now time to fetch the new ball joint from the freezer. Get it lined up in the knuckle and place a piece of wood (2x4 will do) on its flat surface - use a piece small enough that it just protects the top of the ball joint. Now with the club hammer use a couple of firm hits on the wood to seat the ball joint in the knuckle (as below).

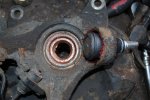
Once its seated, use lighter hits around its edge to locate it evenly. When its completely in don't forget to attach the retaining clip (located below).

(This is where a press would come in handy)
Obviously just reverse this procedure to put it back together, don't forget to replace any cotter pins, use plenty of copper slip on the bolts you do up, and torque nuts up according to the correct specifications - and if the ABS light stays on just go for a drive and after a very short period is should go out - then go have a beer
I would appreciate opinions on the necessity for an alignment following this - from what I've read opinions differ - I have very recently had 4 wheel alignment done and after the ball joints I haven't yet felt a need for a realignment. If you are changing the track rods or camber arms at the same time an alignment is definitely essential.
Tools Needed
- 10, 17, 32mm sockets / ratchet
- 17mm spanner
- Philips & flat head screwdrivers
- Ball joint splitter
- Pliers
- Retaining/Snap ring pliers
- Rubber mallet
- Club hammer (or something pretty hefty!)
- Large deep impact socket (I think I used a 28 or 30mm)
- Torque wrench
- Freezer
Part Needed
- New ball joints
rolleyes - should come with new retaining clips & nuts- New hub nuts (recommended)
- Some fresh cotter pins
Before starting work always ensure your car is properly supported on axle stands on level ground, and chocked at the rear when raised at the front. Also, penetrating fluid is always a good idea before trying to remove nuts that haven't been changed for a decade.
I am in no way saying this is the correct method for doing this, purely sharing what I've learn't and how I achieved it in the absence of a press:
So this is how it went...
1. Place your ball joints in the freezer the night before for them to contract as much as possible.
2. Before you get the car up on axle stands, it will help to loosen the hub nut (32mm) whilst the wheels are still on (seems obvious but you'll need to remove your center cap in order to do this). The hub nut should have had a crease made in it where its been 'locked' in place (see below), you'll need to fold this back out before you start loosening it. Also a breaker bar might be necessary to get the nut moving.
3. (Skip this part if you don't have ABS) Now with the car raised and the wheel off, the next step is to detach the ABS wire so its not attached when you remove the knuckle.
Firstly, inside the engine bay next to the strut tower you'll see this orange plug (see below) that you need to undo - note you'll need to press in the clip on the female part of the plug, and have some patience - they can be stubborn.
Now in the arch, the bracket holding the ABS wire to the car needs to be undone; remove the 2 x 10mm bolts (see below)
The orange ABS plug can now be guided out through a hole in the arch (see below). You'll need to remove a grommet and get the plug at the right angle to persuade it through the hole - don't pull on the lead, feed it through.
4. Next up the brakes need to be removed from the knuckle: For the caliper, start by removing the bracket that holds the flexi brake line to the knuckle - 2 x 10mm bolts.
Now that the lines free, undo the 2 17mm bolts (pic below) holding the caliper to the hub, and persuade the caliper off the disc (rubber mallet might help..) - be ready to support the caliper as it comes off the disc.
Next you want to support the caliper somewhere out the way, where there's no stress on the brake lines. I used cable ties to hang the caliper from the upper arm.
Now undo the cross head screws (below) holding the brake disc to the hub and slide the disc off. I've found using the correct philips head and a 1/4" ratchet is best with these little screws if they've been in a while - you don't want to burr the head and end up having to drill out!
5. Next up is the track rod end, attached to the knuckle via a ball joint (see below, this is obviously after its been removed). In order to remove it you'll need to pull the cotter pin (if there is one - I'd recently replaced mine with non-Honda parts that just came with a self lock nut) out from the ball joint stud, and loosen the 17mm castor nut right off.
Using the ball joint splitter you can then pop the ball joint free from the knuckle (for those not used to using them, it's best to thread the castor nut back on the stud a few turns before using the splitter - this will stop any parts becoming airborn in your direction, if it takes a lot of pressure to release the ball joint). But make sure you've loosened the nut off completely and then threaded back on before you split the ball joint, otherwise you'll just spin the stud when you try to get the castor nut off - I've learn't the hard way more than once - damned short term memory!
Careful not to damage the these ball joints when you split them - probably a good time to replace them if they're as old as the lower ball joints!
6. Now the only parts holding the knuckle on will be the lower ball joint, the ball joint in the upper/camber arm and the hub nut.
Firstly loosen the hub nut some more but don't take it off - now with a rubber mallet give the nut a few gentle taps until the drive shaft moves a touch. This is just to help it come out easily later on - now go ahead and take the nut right off.
For the lower ball joint, this is now the time you find out if its going to come off with or without a fight!
The 17mm castle nut is located as shown below, if there's a cotter pin present remove it.
Given that these castor nuts are likely to be old if your ball joints have had it (136k miles on mine), they are likely going to spin the stud inside the ball joint when you try to undo them. So for the first side I did, I got around this by using the trolley jack to raise the lower arm slightly and use the weight of the car to push down on the ball joint (be conscious of where your car is on the axle stands when doing this). This held the stud firm enough for me to release the castor nut.
But... on the second one (below), nothing I tried would stop the stud spinning so I resorted to a dremmel and cut the nut off (I'm not delicate enough with an angle grinder
)Before you split the lower ball joint, its time remove the upper arm - procedure would be the same as the track rod end (cotter pin/loosen nut/split ball joint carefully/remove nut) - only difference being you'll likely need a 17mm spanner for this one as its in a tricky spot to get a socket on.
Now finally go ahead and use the ball joint splitter again and pop the knuckle free from the lower arm. You should be able to gently separate the knuckle from the drive shaft and end up with this -
7. Take the knuckle over to a suitable work bench and try and rope in an extra pair of hands to hold it steady (not a great shape for a vice!). Firstly pry off the rubber boot, with a flat head screwdriver under the ring holding it on.
Now take a deep impact socket with a similar diameter to the ball joint (IIRC I used 28 or 30mm) - with it held on the stud side, take a club hammer and with a few hard hits you should knock the ball joint through and out.
8. Now prep the knuckle for the new ball joint, I used a wire wheel attachment to clean up the inner faces, and then applied a decent amount of grease (red rubber in this case as that's what I had to hand, but any should do as its just to help the new ball joint in).
9. Its now time to fetch the new ball joint from the freezer. Get it lined up in the knuckle and place a piece of wood (2x4 will do) on its flat surface - use a piece small enough that it just protects the top of the ball joint. Now with the club hammer use a couple of firm hits on the wood to seat the ball joint in the knuckle (as below).
Once its seated, use lighter hits around its edge to locate it evenly. When its completely in don't forget to attach the retaining clip (located below).
(This is where a press would come in handy
)Obviously just reverse this procedure to put it back together, don't forget to replace any cotter pins, use plenty of copper slip on the bolts you do up, and torque nuts up according to the correct specifications - and if the ABS light stays on just go for a drive and after a very short period is should go out - then go have a beer
I would appreciate opinions on the necessity for an alignment following this - from what I've read opinions differ - I have very recently had 4 wheel alignment done and after the ball joints I haven't yet felt a need for a realignment. If you are changing the track rods or camber arms at the same time an alignment is definitely essential.
Attachments
-
 $DSC_0820 (2).JPG132.9 KB · Views: 2,545
 -
 $DSC_0823.JPG285.7 KB · Views: 2,640
 -
 $DSC_0825.JPG277.3 KB · Views: 6,347
 -
 $DSC_0821.JPG241.1 KB · Views: 2,659
 -
 $DSC_0827.jpg188.6 KB · Views: 2,858
 -
 $DSC_0828.JPG221.9 KB · Views: 2,426
 -
 $DSC_0829.JPG219.1 KB · Views: 2,374
 -
 $DSC_0831.JPG174.2 KB · Views: 4,599
 -
 $DSC_0832.JPG196.5 KB · Views: 2,421
 -
 $DSC_0816.JPG165.4 KB · Views: 2,430
Last edited: